Wednesday, May 25, 2016

Ikea Kitchen Extravaganza

I am of the firm opinion that when you add the word "extravaganza" to anything, that it automatically ups its excitement factor. It worked right? Now you are alllll prepped for a great post!

Awesome. Let's do this. It only took me hours to take, compile, and edit all of these photos. And that doesn't count the hours to actually makeover this kitchen ourselves. What I'm trying to say people is...I do this because I love you. This was hard labor! I'm not above shameless plugging. My friends all know this to be true.


So, once upon a time, we bought a cute ranch house in an amazing neighborhood. The type of neighborhood that has beautiful big trees, an established but not-stuffy feel. It had a greenway (trail along a river where you can run, ride bikes, walk dogs, enjoy nature), and a community pool. And the house was on the corner between two cul-de-sacs. I mean, that's like the double rainbow of real estate if you have kids!  Then we went inside and the kitchen was...underwhelming, to say the least. I had plans right away to paint the cabinets like my previous kitchen. I took a deep breath and said, no problem, the house is worth it. I can see the potential!


Sure, they was only this awkward tall cabinet for a pantry. And yeah...the sink is off center from the window (WHY???), but, I can make it work. Yeah, the linoleum is yellowed and there is a weird, random strip in the middle of the floor (see above, the white stripe on the floor)...but I wasn't afraid.


I thought, yeah, I'll take off some doors and it will freshen the whole thing up.


And at least on this side of the kitchen there lots of storage, and I can see into the family room!


And who doesn't love a cozy eating nook? The walls were a hideous pinky/tan...nothing a little paint couldn't fix. It'll be easy, right? All cosmetic, right? Hahahaha. #famouslastwords


So of course, we discovered mold under the sink. (Because, of course). And of course it was pretty extensive. (Because I cursed us with my "it will be easy" positivity ha!) The idea of mold in my cookine area frankly freaked me out. So our SUPER budget project was suddenly out the window. The drywall had to be torn out and replaced behind the sink.


And I thought, well...Ikea is having a kitchen sale. And we are handy, we can do this! We'll keep the same floorplan and just squidge the sink over while we're at it! Hahahahaha! Oh my little naive self. I ALWAYS underestimate the work in every project. We had to scrape and repair the popcorn ceiling, tear out and replace the flooring, and install new cabinets. No biggie. :) But in the end, after all of the back-breaking work, it was worth it! We created a kitchen that I love to be in and it was still very much on a budget.

 Ta-da! The drywall was pretty damaged from tearing up the tiny backsplash and tearing out and repairing the drywall behind the sink. So we decided to do a backsplash. I love beadboard, but I love CHUNKY beadboard even more. But I wanted something waterproof and wouldn't be an issue behind the stove. So we found this great vinyl product that you can even use outside. It was pretty easy to install all things considering! I found the faucet (a Perrin & Rowe for your faucet enthusiasts/nerds like me) on eBay for a STEAL.


And then I died and went to heaven when we got a farmhouse sink. I decided not to do the Ikea farmhouse sink because I heard mixed reviews about it. But, trying to figure out how to make another farmhouse sink work with the Ikea system was difficult. Finally I found an online forum that showed how someone else got around the issue using a short apron Whitehaven Kohler sink. It is one basin and I LOVE it. I'm sorry, I can't stop capitalizing things. It is my favorite part of the kitchen for sure.


 When I designed the kitchen, I decided that I really wanted a countertop overhang. We had removed the awkward pantry cabinet (and moved a larger Ikea pantry unit to the adjoining laundry room), so I knew we had a bit of space to do it. I love to bake with my kids, and I'm really happy we made that decision! I didn't take a picture from an angle you can see it, but it's straight back from the loaf of bread, before you get to the dining table. :)


A close up of the bread, because I have priorities, and bread always tops that list.


I was also insistent on some open shelves that I could decorate for holidays and easily reach my baking supplies. This was also to save on budget. Open shelves are much much cheaper than upper cabinets.


I'm not the world's best low-light photographer, but I still love this photo with it's shadows.


This little dining nook has gone through many variations as it was difficult to find furniture that fit the scale of the space. But I finally think I figured it out. But as all of my rooms, it is subject to change. :) I found the amazing bench (a Ballard designs dining bench) on Craigslist for so cheap it's crazy ($30). The guy who listed it was more interested in selling the table he had listed and was super happy for me to take the set off his hands. Best deal I've ever made!! The table is an Ikea table that I painted the legs, the chairs are painted Goodwill chairs.


Remember that long bank of cabinets that looked into the family room? Well they became a bajillion times more space efficient because now they are pull-out drawers. I got the hardware on eBay, naturally.


The countertops were bought through Ikea as well, because with the kitchen sale they were a fair deal. Despite other people trying to scare me off of them (well...and sometimes myself), I went for the marble, and I have never regretted it. I got them honed, and that has made a great difference in any etching. But I seriously don't even care, it just gives them a nice patina. I love them!


On this side we did put some doors on the cabinets (which were surprisingly not hard at all to hang. Ikea really does have a great system). 


We kept all of the same appliances, and I really enjoy cooking with gas. I don't know how I'll ever go back if we ever move from this house.


So, there is my little tour of our kitchen makeover. Like I said, lots of sweat and tears (but no blood thank goodness) were spilt in the name of this project. But we are so proud of the work we put into it. It really has become the heart of our home. The ikea planning system is a bit of learning curve, but I'm glad I designed it myself!

And just for fun, I put some before and after's right next to each other and posted them below so you can really see how big of a change the space underwent.

Hope you enjoyed the EXTRAVAGANZA. I know I did. :)


Saturday, May 21, 2016

Boho Powder Room Inspiration

We've been working steadily on quite a few projects over the past few weeks. One project is VERY exciting to me personally, because it is for one of my college roommates and close friends. Even more exciting is that in exchange for my help, she is flying me up for a weekend in June to put some of her rooms that I designed together with her!!

It has been a blast coming up with new ideas, and helping her figure out her style. Once she started to see patterns in her own likes, she was on fire and loving the process! We've been scouring Craigslist and other sources, and found her a fantastic tufted couch that  I can't wait to show you once we're done with it!

But until that trip, we've been working feverishly to come up with plans for each of her rooms. While I've created layouts with 3D decor for her main rooms, for her little powder bath I just put together a mood board. It's still a work in progress, depending on what she ends up liking about it, but I thought it would be fun to share. Her style is a very cool mix of boho and midcentury modern. She loves light colors, plants, and punches of minimalist color and pattern. It is a SUPER fun style to design in.

We've also been working with another local friend on her laundry/craft room, and now that she has approved the layouts, we are working with her on sourcing Craigslist items too.

I'm still in awe and so happy to be doing what I love. It touches me to no end how supportive people that have known me for years have been. Thank you. Truly. (and below are just some quotes I've had on my mind the last few weeks as I've taken this leap.) Exposing your dreams and going after them can cause some folks to feel jealous/think you're acting too big for your britches. But, I've been so lucky to have friends that do the very opposite. I'm so grateful that the amazing women in my life have lifted and empowered me on this journey! If you have a dream, go for it!! I'll be there cheering you on too. xoxo


Boho Inspired Powder Room


Thursday, May 19, 2016

Master Bathroom Makeover

I love this next redo. This is our current master bathroom. The cabinets were still in decent shape, and we didn't have a lot of money to make it over. We didn't want to mess with moving any plumbing, or redoing the floor which the previous owner had replaced not long before we moved in. 


But I was adamant that we had to do SOMETHING, because the sink--your the basic cultured marble--was cracking and discoloring. I had tried everything to make it look clean without success. I thought of lots of potential ideas for replacing the countertop, but with it being only one sink and a long empty counter to the right, it made it impossible to find an inexpensive solution that wouldn't look really amateur. I was stumped for a good while.
 But after a few months of searching craigslist, I had the best piece of luck! A man was selling a bunch of the same type of sinks, and happened to have one that was an almost exact match to my old one, except no cracks! Sure, I would have loved to have new marble or granite countertops in a perfect world, but I was seriously thrilled to have found a match that worked great and saved us SO much money!
 Interestingly, when we took down the mirror, there was all of this strangeness going on behind it. You never know what you'll get with DIY, that's for sure! We took down the mirror and I then realized how expensive mirrors that size are. It's crazy! Instead of buying one, we bought a mirror cutting kit and cut down the old mirror and put it into a frame I found and repainted from Goodwill.


 The last thing I decided to do was paint the cabinets. I am a big fan of making my own chalk paint and using it on furniture. It is cheaper than the paint you buy ready made, and is fantastic! I'll post a link to my favorite recipe. Just click here!  I love white cabinets usually, but I went with a custom blue I mixed in the end because I don't think chalk paint stands up to as much scrubbing as usual paint, and I didn't want it to look dingy. I did wax it, and the great news about chalk paint is that it is easy to touch up and you can rewax it whenever you want!
 Oh, I almost forgot! I really love planking and convinced my husband to try it out in our bathroom. I only wanted to go up about 3/4 of the wall and wanted to top it off with molding, but we still haven't finished that part. That's the only downside to DIY ha!

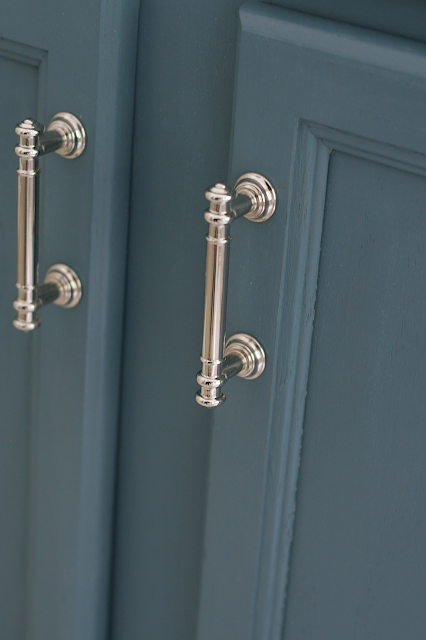
 We updated the hardware with some pulls found from Home Depot. I love Restoration Hardware's cabinet hardware, so I was really happy to find some "look alikes" for a MUCH lower price. Here's a close up.

In the close up you can also see how much woodgrain is visible. I know I was worried about that before painting, but I think it looks great! Not too noticeable, and I think that has a lot to do with the nature of chalk paint and wax!


 I was really convinced that I was going to splurge on the lighting, because it can make such a big difference! We got rid of the old lights, which I always call Miss Piggy's Hollywood lights, and I was looking for a replacement for a few weeks, but found myself cheaping out again. Because that's who I am. I apologize not for my cheapness. It just makes me feel even better when I figure something else out and it ends up great and costs so much less. This light fixture was on an endcap all alone at Home Depot and was clearanced. Absolutely nothing wrong with it! It was a major find!
 I was a little stumped about what to put in that small space between the tub and cabinet. I figured I'd have to get a cute hamper or something, but I wasn't thrilled by the idea because I knew it would look clunky, and I don't like laundry in a bathroom. Then I chanced upon that little bench for $3 at Goodwill one day! I didn't know if it was the right size, but for $3 I took a chance and it fit PERFECTLY. There may have been happy dancing. Not by me you understand. Ahem.


 Ah yes, the faucet! We replaced that as well! My great deal on this was that I found it on Amazon under their "used" section. That's one of my favorite secrets. Sometimes people return things to Amazon, and there's nothing wrong with them. Amazon then will occasionally relist those items heavily discounted. And that, my friends, is how I got this beauty for 3/4 of its list price! The description said it had dents, so I was a bit leery. But when I got it, there wasn't a dent in sight. I finally figured out why it had probably been returned. They show it as having different handles! I actually loved the vintage knobs, but the other person probably returned it because it had been mislabeled!


And that, my friends, was our master bathroom makeover on, you guessed it, a major budget. I still love it to this day! It feels very fresh and pretty!