Saturday, November 12, 2016

Laura's Kitchen Story

Have you ever read the book, If You Give a Mouse a Cookie? If so, you probably know that the premise of the book is that if you give an inch, they'll take you a mile.

Well, that sort of has been the case with my friend and E-design client Laura. Only she's not the mouse in this equation, I AM. :)

Let me back up a bit. Laura contacted me a few months ago about wanting to make her home feel less like just a place to be, and more like a home that really reflected her and her family. Her style is a very beautiful mix of traditional architectural elements like beadboard and molding, combined with bursts of cheerful color that keep the space from feeling too stuffy or old fashioned. She also loves a coastal feel, without getting too literal (no fake starfishes need apply).  I give nicknames to all of my clients' styles, and I dubbed Laura's style Fresh White Hampton.

She wanted to start with her family, living, and mudroom spaces. I was very happy to comply. But then, she offhandedly mentioned that someday she would like to revamp their kitchen too.

Oh boy.

So, in my defense, you see that she opened that can of worms herself, right?? Haha!

No, but honestly, I understood and wasn't going to give it another thought, but for some reason, after looking at the pictures of her kitchen and dining area and what frustrated her about those rooms (and the front family room) I realized that what was really frustrating her was...her kitchen.

Sometimes helping interior design is also identifying where people should start. Now to be fair, a kitchen is a huge undertaking, and I can understand why it wasn't on her list. Automatically we just know that kitchen makeovers are going to be pricey, so without realizing it we push those "wishes" back to "nevers" because we don't want to get our hopes up or feel frustrated with what we have.
I SO get that!

But after I looked at her kitchen and what she said was frustrating her about the rooms surrounding her kitchen, I realized that it wouldn't make sense to do over those rooms without addressing the room that connects all of the other rooms. Even if she couldn't do it first, having a plan in mind for it eventually would, I thought, help give her focus and excitement to finishing those other spaces--knowing that she was getting furniture and such for a space that would work once the other space was renovated.


Let's see a few pictures and I'll tell you how I came to that conclusion.

Laura is like me, she LOVES the light. This room is at the front of her home and that front window is HUGE and beautiful. You'll notice her kids love to play in the corner and she entertains friends with their kids in this space quite often as well.


Here is the room from the other direction.


Behind this long wall is her kitchen. This is an issue for a couple of reasons.


1. It is cut off from this front room where her kids play and her guests sit. So when she is in her kitchen, she feels too separated. I would too.


Her dining room is pretty and right off the kitchen as well. Lots of great light with the two windows.


 This wall between the kitchen and dining room is our nemesis too. It blocks off tons of light from reaching that kitchen.


This is the "eat-in" portion of her kitchen. But it is so small and dark that she can't use except for a kid play area.


The offending door and strangely short window....


You can see that Laura's cabinets are actually in very nice shape--the door style is pretty, and granite is always nice! But you can also see that this portion of her kitchen is very cramped, and the kitchen overall is a little dark (the cabinet color and backsplash are probably contributing to this feeling).


 This is what is on the other side. Remember that long wall behind the couch in the family room? This is what is on that wall.


Again, these cabinets could look great updated with paint, and she has stainless appliances on this side, all pluses!

So without her knowing, I started playing around with her kitchen with my partner Katie one afternoon. We both realized there were several ways she could make over her kitchen, that could actually be cost effective. So....even though Laura hadn't asked for a kitchen layout change, I emailed her and told her that I had done one and she was free to ignore it and it could just be for fun if nothing else.

She was a little surprised at first I think, but once she saw the idea, she started getting excited, and together we played around with the layout until we came up with something she was completely excited about--not just because it would make her kitchen work much better and be more to her style, but because it fixed the issues she she had with all of her other rooms!

Let's look at one of the first versions I did for her.


In this version we just took out the wall between the dining room and the kitchen. Since this was where her stove currently is, we had to play musical chairs with a few other items...like her door outside. Since she already had a large window in the dining room, we knew it wouldn't cost as much to change that from a window to a door! Cost savings one (although we thought a set of french doors would be beautiful, so that would add some cost), but the increase in light would be amazing.


In this version we walled up the door and extra window and put her stove in its place, while adding additional cabinets on the wall that used to be her eat in kitchen.


Trying to save money, we suggested that keeping this wall here originally.


Once Laura and her husband saw these plans (which could be executed using their current cabinets, plus adding a few and having them all painted to look uniform)--and would only require a few "big" changes (like moving one wall and a gas line which isn't bad), they started to get excited and see the possibilities.

But they still were bothered by that wall being in the way. I told them I could remove it in my layout, but it would probably be expensive as I was guessing it was structural.

I then had another idea come to me, what if we left a couple of columns (not roman columns or anything cheesy like that!) but basically exposed support beams sort of thing to keep the structural support (and it may still require a beam above), but it should cut down on the cost!

So I did a mock up of that and they loved it!

 Now Laura would be able to see her kiddos playing, have tons of extra light, but still have her sink looking out over the backyard. From this vantage point you can see we kept out the wall between her dining and kitchen. You can see our plan for her mini playroom space in the corner. :)


 We kept the french doors idea.


As you can see, the design process is exactly that, a process! Now that Laura has decided on what she wants to do with her kitchen in the future, it has helped us to narrow down the proper sizing of couches, and all of the other furniture. It has also given her a sense of excitement knowing that many of these changes are actually within reach.

And that's why we love doing what we do! We'll keep you updated as Laura makes progress on her spaces over time. Can't wait to show you our plans for her living room in addition to the ideas for her mudroom and laundry we are working on as we speak!


Thursday, November 10, 2016

One Room, Five Rugs

The other day I was sending a bunch of inspiration boards out to clients, and realized it might be neat to share some of these "in process" boards.

One thing that I think people worry about is how helpful design work would be long distance. Right now I have two clients in New York, two in Utah, and only one locally! While it does take a bit of work up front from my long distance clients--getting me measurements and answering questions about style and room usage, I think E-design works really well because it goes at whatever pace people need it to go. 

Often the folks I work with will email me postings from craigslist--so my responses have to be as quickly as I can make them. Other times they need time to send off for fabric samples, or go into a brick and mortar store to sit in a variety of couches. Because it is at their pace, it makes it an easier arrangement for both them and me! Flexibility, creativity, and patience are all keys in making a space on a budget, and E-design help is really conducive to that!

Are you convinced yet? Oh good. :) Anyway...one way that I love helping my clients to make decisions is to take their inspiration boards, and switch out key pieces. Since it can be difficult for people to picture what their spaces would look like with different rugs or furniture, the Polyvore boards work wonders.

Take the boards below. My client Kim found an amazing tufted blue couch on craigslist after we searched for weeks. She was able to see past the skirt that aged the sofa, and once she got it home took it off. I want to show her and her hard work off. Such a difference with such a small change!


Before, with the skirt still in place at the bottom of the sofa


 After, skirt removed! Instant update! And it was a fantastic price!

Once she found her statement piece in her room, we knew the next big purchase (besides her other couch) would be her rug. 

Now let me just take a second here to talk about how difficult finding the right rug is for EVERYBODY. Rugs are hard! I've bought my fair share of rugs that I thought I would love in my space only to get it home and think, wow...that's really not the look I was going for. ha! They can be tricky to visualize in the room! This is where inspiration boards are worth their weight in internet gold. I now do this for myself to save from the dreaded RR--- rug regret. :)

So want to see some options we looked at for Kim?
 Kim's style is an updated farmhouse feel, with blue and orange and white. All of her inspiration rooms had several things in common, one of which was very light rugs on the floor.

When I told her that, she was both surprised and a little...worried. :) She has young kids, and she faces the dilemma that all moms face. She wants it to look nice and to have a beautiful space...but light rugs and kids is pretty much a dead on arrival idea.

So, we looked for things that would still translate as light, but hide dirt. Above, we tried a jute rug with light patterns. Texture, but still dirt hiding.


This option was a greige tone to go with her wall color and pull out the neutral tones of the couch as well.


From far away this rug looks almost cream, but it is actually a mottled oatmeal, that would be both soft and, you guessed it, help camouflage dirt.


This option looks like it has a fair bit of white on it, but up close it is actually quite variegated, so dirt would hide pretty well!

This rug option took a much more traditional route, but by keeping to patterns and soft blues it would keep the room light feeling and stay kid-friendly.

So, these are just a few of the many options I emailed Kim. Isn't it fun to see how different the room feels with just the change of the rug? And it saves all of the heavy lifting and stress of buyers remorse. :)

Kim is still weighing her options, and waiting to see what great sales Black Friday brings on my recommendation. I wait to buy all of my large rugs on Black Friday from Rugs USA online because they drop their prices so low and their quality is great! So hopefully we will find something before then so she can pounce on a good deal!

All this to say, if you're a visual person, (or even just a nervous decorator) our inspiration boards can help you see what your room can be with minimal furniture moving required! So, if you have a room that needs an overhaul, or even just an extra pair of eyes for a spot that has bothered you for years, email us, we'd love to help!

Monday, October 17, 2016

Operation Murphy's Law

Remember that time I titled my post Back with a Vengeance (aka last week)! and then...nothing. Ha! I should know better than to tempt fate like that! Of course what happened was my kids got sick, and my tooth starting aching, and all of the sudden my week was gone. Seriously. Murphy's Law is evil.

So, no fancy promises this time, but I haven't forgotten about you. As soon as Murphy helps me locate my nice camera's cord (curse you Murphy!) I will upload some photos of my very in progress new house.

Until then, how about some pins that have been inspiring me this week as I work on a variety of edesigns for clients. Their styles' range from ultra-sleek and modern, to cozy Fixer Upper inspired rooms. It makes for a fun job!

Enjoy!


via Dwell


Monday, October 10, 2016

Back with a vengeance!

Hello again! It's been a long while, like possibly 500 years in blog years, but the good news is that I have definitely not been lazing about! I've been busy busy. In the time that I spent ignoring this blog, we moved! So for months leading up to and following that major life change I was busy reorganizing, decluttering, finishing up projects, and then staging our last home. (Which was all worth it, seeing as how we had multiple above price offers on the same day we listed!) And then it has been more of the same with settling it to our new home--plus all of the work of getting our kids settled in new schools. It's been crazy busy! Add to that the fact that I also started working with four new edesign clients, and I guess you could say life has been full!

So, there's my excuses. Forgiven, right??

First, let's talk new house.

We loved our old house SO much. It was hard to leave. I loved my kitchen (disclosure, I miss it). I loved that it was a ranch style (disclosure, my legs miss not having stairs). But we absolutely love our new house too. It was the right move for our family, and the best part is that we have a huge backyard that we enjoy immensely. When you live in the South, the outdoors really are another room for a good part of the year. So having a private, big yard has been a dream come true for us. 

This would probably be a good place to post some pictures. I don't actually have that many! I've spent so long working on the kitchen (which we hope to remodel in the next six months or so) that I've sort of slacked in that area. 

So here is one picture of the exterior. The shutters and door need to be repainted badly, and I want to eventually add some sort of portico or front porch. But the to-do lists never end with me! :) 

There's so much to catch you up on that I've realized I can't possibly do it in this one post.

So. New idea. Over the next few days, how about we take a tour of my new house? I'll show you some befores. I have a few "afters/in progress" pictures. And I'll tell you some of my plans. That way you can sort of take the journey with me as we make this home our own over time. I'll try to tackle a room a day. This will be the week of the new house. Sound good?

And then, once we get that done, I'll tell you all about the awesome people I've been working hard with over the last few months to come up with plans for their spaces. We've got some fun makeovers coming. So stay tuned!

Sunday, June 12, 2016

Design Adventures in upstate New York

First of all friends, LONG POST ALERT. Get cozy. I can't skimp on this post, because I had the best time, with the best people, and that kind of bestness doesn't get skimped on. 

So the beginning of this makeover started a few weeks ago. A few days after I announced that I was starting this whole budget design endeavour, one of my favorite people texted me and said something along the lines of, "You are the droid I've been looking for!" (that's Star Wars speak for, "Your business showed up at just the right time in my life). My former college roommate and darling friend asked me a few questions about different problem areas in her house and I happily answered.

This went on for a day or so, until she asked, "Theoretically, if I brought you up here, would you be interested in helping me really put my house together over a weekend or something?" To which I responded, "Um, hells to the yes." Apologies to my sainted Mother for the cussing, but I was SO dang excited by not only the thought of helping her finish up some of her spaces, but also seeing one of my best friends, AND meeting her kids. Triple winner! Not to mention the bolster of confidence I felt knowing that she believed in me so much at the beginning of my new venture!

I'm writing too much, gah, I'm sorry. To the pictures, I know!


First of all, the most important thing you have to realize about my friend Merz's house is that it is ADORABLE. The above photo is a BEFORE picture. Yeah, you would have probably called her back and said, um, there's nothing I can do to help you. You've got this. I almost did, but then I remembered that I was getting a plane ticket and fun weekend out of it and kept my mouth shut. Mama may have raised a cusser, but she didn't raise a fool, no ma'am.


I mean, look at how fun her house is! They have a swing for everyone in the family in their front yard tree. It's so charming and cool! Just like Merz and her husband! The neighborhood kids flock to their house as you might imagine!


Ok, so on to business. She was originally thinking of keeping these pieces on the front porch, but wanted some ideas on possibly painting them. Later she found some adirondack chairs that had chipping dark brown paint for the front instead. We tackled those while I was there!


And this was the view into her front living room from her entry way. Looks peaceful, right??


Every house has a few "rules." Meredith's rules that she wanted me to keep in mind were 1. She LOVES her view, so no blocking it. I teased her about her religious devotion, but once I was there, I totally understood. She lives in a gorgeous, wooded neighborhood, and the views are wonderful. Plus, they bring a lot of light into the house where some of the rooms don't have an overhead light. 2. Keep it cozy--she likes lots of fur rugs, shag-type rugs, and soft throws because she has three young children. She wanted it to be a happy, comfy place for them. 3. She needed to keep the recliner because her mom lives down the street (just a few houses away!) and it was a necessity for her Mom's back. Those were all rules I could live with. We also wanted to re-use as much of her furniture as possible, and spend her budget on items that would give us the most impact.


Here is the living room looking towards the entry. And also, a few of her cute kids. :)


Another cool fact about Merz is that she has her own podcast (it's called Red Raider Radio and is awesome), AND owns her own business called Mama Goose on the Loose where she plays live music and teaches kids songs on her guitar or piano. She's a force of nature and is super inspiring to me. I wanted to make sure she had spaces that reflected her warm, and incredibly kind-hearted personality as well as allowing her to keep up easily with her on-the-go life!


Here is their den. It's tucked away, and is a fairly small space. I loved the built-ins and she had fantastic, neutral couches to work with, which made moving things around much easier!


You can see what I mean by great pieces, right? Pretty rug, nice sectional. The only thing that really bothered my friend is that she had commitment issues about hanging things on the wall, and she felt like the rooms lacked a certain something.


When I saw the spaces, I could see that it was SO close to being perfect already! I realized that what would really help Meredith would be to layer some elements to make the spaces pop and feel homey. Meredith would soon learn that this, in my language, mostly meant MORE PILLOWS, haha!
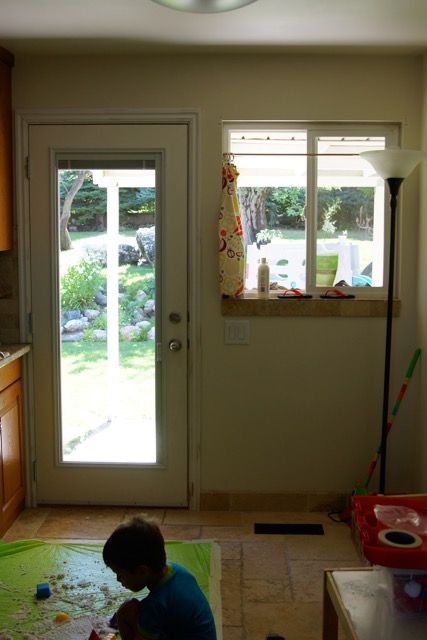

The entry way.


That little room with the yellow table was a playroom (but is now a puppy training room until their puppy is housetrained!)


I knew right away that I had some plans for this tiny space in their entry.

She also sent me a bunch of photos of furniture she had inherited or was given and wasn't using.


A GIANT abacus. They really wanted this incorporated--it was one of their favorite pieces. And I was more than happy to oblige, such a cool piece!


We ended up using this little table in the front entry!


And then...as part of the process, I sent link after link of items from Craigslist. This beauty was one of the things that I convinced Meredith to purchase. It was $30, and I think because it was so cheap, she was willing to trust me....though she may have started questioning the wisdom of that trust at this point ha!

 OK, on to the fun stuff!


I thought it might be fun to let you see what goes into this process. Early into the process I have folks take their room measurements and I enter them into my design software. I then have them measure their big furniture pieces that they want to keep and I plug pieces of furniture in with those dimensions. Above is what the layout looks like from a bird's eye view. (from left to right: entry, living room, den).


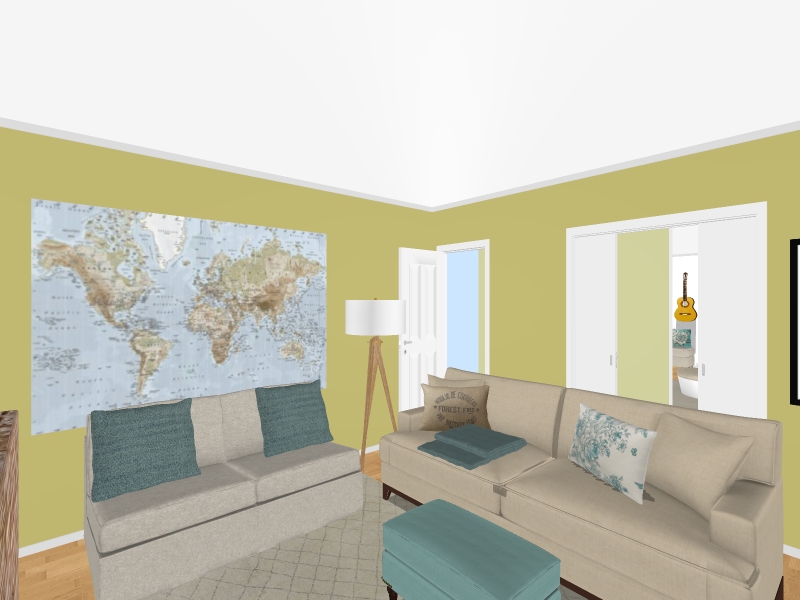
I then give the client some "snapshots" of what the space will look like, like the renderings I did of her den below.


This is another view of the den (our backs to the mantel).


And here was my rendering of her den from the opposite direction. We originally had a chair in the left corner, but ended up putting her upholstered bench there since she already had it!


Next in the process, I will usually do a polyvore board. I do this because the program I use to make the layouts doesn't use specific design items that are for sale--just pieces of furniture that are different sizes/styles. So I want my clients to know what some of the real finishing pieces might look like. I also want to make sure I'm on the right track with their style. Here's two of Meredith's mood boards for her entry way and her living room. Not everything makes it into the final product, but it helps give us a jumping off point!

Meredith front entry


Meredith Living Room First Try


Okay, so now that you've seen a bit about the process, how about some real life photos? Let's start with the den.

Meredith loves this bench, and was really excited to use it in her space. We had originally planned for a chair to go in this area next to the built in, but you can't beat free! We added a pillow to make it more of a reading spot, rearranged the television, and added some plants:


Plant holder was a Goodwill find.


We didn't have time to switch up much on the shelves, but we did take a few things down and shuffle a few other things around.


Pretty early on in the process I knew that I wanted to have her switch her large sectional to the bigger room, which was her living room. I also knew I wanted to have the couch from the living room facing the fireplace. I suggested she place a large piece of artwork, or gallery wall on this wall in the future since this was one wall we didn't get to in time!

You may have also noticed that we switched out her previous rug to one she had upstairs--it was a better size and had more color than the one she had here previously. We finished the space by adding that awesome tufted ottoman for people to put their feet up and added that rich, navy blue--which helped ground the light colored space.


The next space we tackled just got a mini-spruce up. She had a small powder bathroom that she wanted to hang a mirror she found at a garage sale. I convinced her that the towel bar over the toilet was a ridiculous (and possibly unhygienic place for a towel. Eventually, she wants to have a mini-gallery wall of quotes and cool pictures on the wall behind the door. We found one paint-by-number dog painting to start her off, but again, didn't get to the rest of it. We were working non-stop for the two and a half days I was there and we still didn't get quite to everything! Anyway, here's the before's.


She hated the tiny medicine mirror, and found a bigger mirror at a garage sale.


So we hung it up and some natural wood crates as some simple and modern looking shelves. Succulents from Walmart dressed them up a bit!

 The next space was the front room--the Living room. I kept her desk and piano in the same places.
 I knew that the room needed a focal point, and insisted that she get a credenza or buffet on the far wall. It took us forever to find the right piece on Craigslist for a reasonable price, but we finally found one! After it was in the room, she agreed that it was just what the space needed. I love when that happens. :)

I also knew a round coffee table would work best in the room. Merz found an amazing coffee table made from a pulley from an old grist mill on Craigslist and knew right away that she wanted it in the space. It is a fantastic piece!


The biggest change in this room was taking out her small bookcase between these two windows and adding another couch! We also took out her awesome yellow velvet wingback and moved it into her bedroom instead.


Once I was there, we also decided to take the ottoman portion of the sectional couch and put it into the corner and make a cozy little reading corner for the kids! This is the room where they spend the most time reading and playing, and we knew the kids would love that space! I love creating little spots for kids in adult friendly spaces!

 Now for the real pictures: The Living Room
The couch turned out fantastic! We removed the skirt and layered some new pillows and suddenly it looked like something out of anthropology or Room and Board. You would never believe it only cost $30 now! (and there's the fantastic coffee table).


This couch is facing our $30 wonder, and was the sectional that was previously in the den. We also hung a huge mirror that Meredith already owned but had never hung!


 The "credenza" is technically a dresser. Doesn't it look fantastic? She got the larger plant and pot from a friend that was moving, and we found the little white planter next to the lamp from Goodwill for a few bucks and planted some more succulents! Here's a close up, I loved how it turned out!


We re-used a few of Meredith's pillows and added a few more for good measure. Because that's my motto--You can never have too many pillows. Until they're suffocating you.


 I had little obsession with this couch. (Did I mention it was $20??) Pardon all the pictures.


We freshened up this area with a round mirror and white vase/pencil holder found at Goodwill.


I wish I had taken a better overall picture of the space, but I was literally running out the door as I was snapping photos, and it was a rainy day, so the lighting was tricky!

The next space was her entry. She wanted to hang these cute paintings of her house in each season, and wasn't sure where to put them. I thought they'd be perfect next to the kids' jackets!


Now here is what the entry looked like before from another angle.


And here it is after:


We added some bins under this bench for her kids' shoes, and hung another plant from a macrame holder because we were allllll about the macrame holders for her space! We also took down the curtains so the space would feel a bit more crisp and light.


I mean seriously, LOVE.

Here's the before again:


And the after:

Here is that little entry space that I knew I would do something with. We hung a mirror she was given by her older sister, repainted that little table white (and put new hardware on). Now it's a great place to check your hair and hang your keys without taking up too much floor space! She also found that rug at a garage sale!

I'm sorry to say that although we also worked on her bedroom a bit, we didn't get a chance to get pictures. Maybe I'll convince Merz to send me some photos once she finishes it up. But until then, I hope you've enjoyed touring some of what we did over our fast and furious makeover weekend! We have to end with the updated outside. We both knew the little porch needed a punch of color, and luckily Meredith had found some great used, dark brown adirondack chairs. We spray painted the chairs and pot and moved the wire table from her den to outside between the two chairs.


And voila!


What it used to look like:


And the after:


I spy some cute kids!


This was the last photo I took before we sped off to the airport, whew! (and I seriously barely made it haha!) Remind me to tell you about how I tried to take home an amazing antique rolling pin in my carry-on (I didn't check baggage since it was a short trip) and got stopped by security for my "weapon." LOL

 So there you have it. It was the most amazing time. I loved every second. And it made me realize that I am in the right business, because even though we worked HARD hanging huge mirrors and patching walls, and painting chairs, and shopping, and drilling, and spackling, and moving heavy furniture, and shopping...I felt energetic and carefree the whole time. Well...maybe not when we were hanging that ginormous mirror. Whelp, that's a wrap. Now...it's your turn, right?!